

While writing in WordPress are you missing Microsoft Word? No more missing, you can write in MS Word and publish directly in WordPress.
You can easily write in MS word and copy them in WordPress editor, but the biggest reason to post directly from Word is to take advantage of the impressive graphics capabilities it offers. Image manipulation, Smart Art, impressive graph, charts MS Word has a lot of offer.
A simple example of MS Word graphic in WordPress post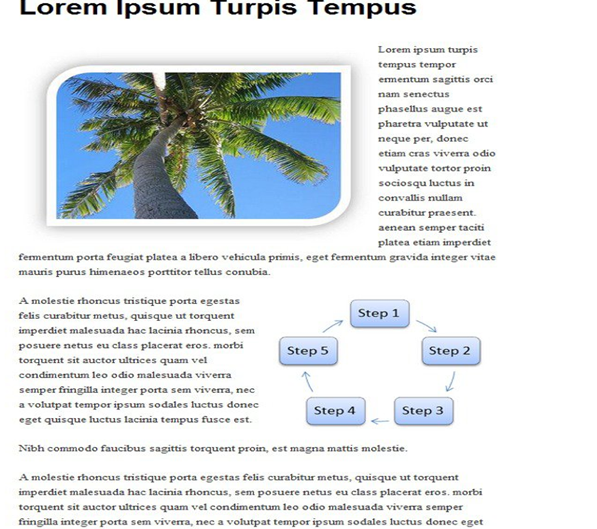
Step by step guide for publishing to WordPress with MS Word
A few points before we get started
- A WARNING Before we go any further, there’s one piece of information you should know. When you attempt to publish a post from Word to your site, Microsoft gives the following warning: “When Word sends information to the blog service provider, it may be possible for other people to see that information. This includes your user name and password. Do you want to continue?”
I can’t really tell you how risky is this. I searched for it but found nothing valuable. So you better know this before you started.
- You may find that Microsoft also has a very nice “offline blogging tool” called Windows Live Writer. However, Live Writer doesn’t have the same graphics capabilities as Word.
- The steps in this blog follow publishing a post to WordPress via the latest version of Microsoft Word (2010 Version). You can also publish with MS Word 2007.It is almost same but some things may be slightly different.
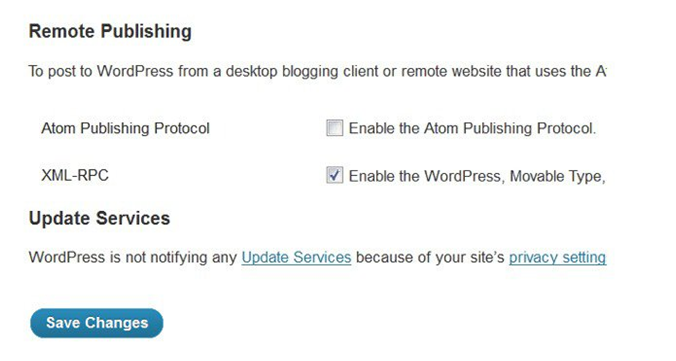
Setting your WordPress site to accept post
The first step is to set up your blog to accept posts from outside the site (in this case, from you using MS Word).
In your blog’s admin area, go to Settings > Writing > Remote Publishing. Check the XML-RPC and click ‘Save Changes’
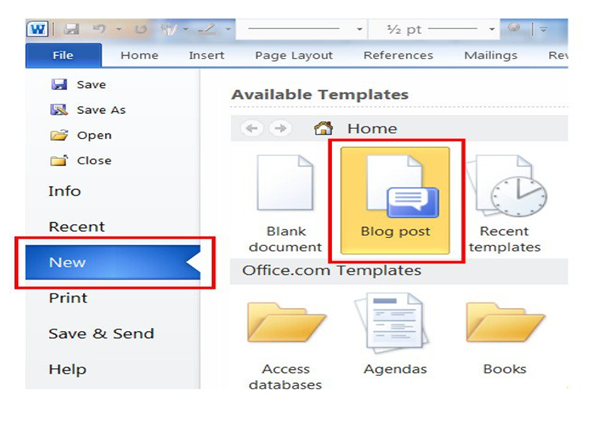
Open a NEW Document
Go File > New > Blog post
Set Up a connection with your blog
For first time you are using the blogging template, you will be given a dialogue box to set up a connection to your site (or “Register” it). You do not have to do this now (you can do it the first time you attempt to publish your post).After you do this once, you will not need to do it again unless you decide to set up another site to publish to. You can publish to multiple sites and easily switch between them in the MS Word interface.
Choose WordPress
On the pull down list, choose ‘WordPress’

Enter Your Site’s Info
Enter your sites info in the box. Replace the section that says <Enter your blog URL here> with the URL to your site (e.g. http://example.com/xmlrpc.php).
If your blog is in a subfolder, you will need to enter the folder too (e.g. http://example.com/blog/xmlrpc.php).
NOTE: Remember that your complete URL here must end with xmlrpc.php. This is the name of the file that Word needs to communicate with.
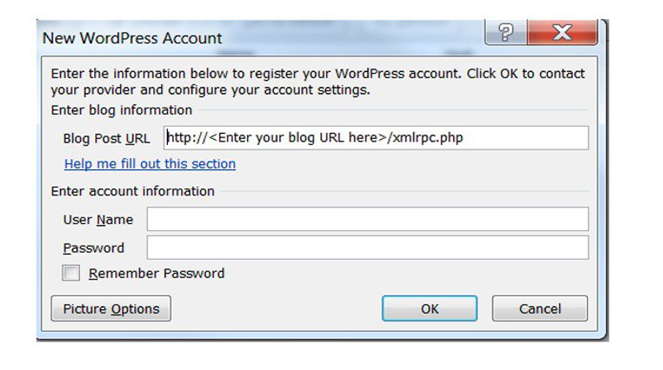
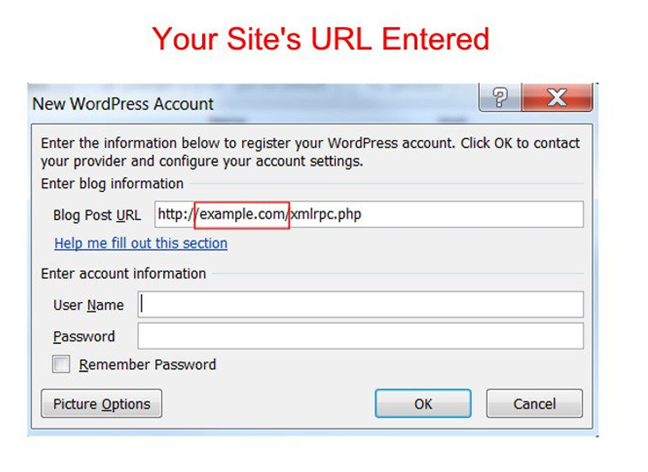
Fill in the User Name and Password with the username and password of you site.
* You will see a link here for “Picture Options.” You can just leave that as it is, and it will upload your pictures to your Uploads folder on your blog. You will also be able to access them in your Media Library in the admin area of your site.
Writing Your Post
Once your connection to your site is set up, you will come to the writing screen. The ribbon at the top has fewer tabs, for example, and the default layout is set to a cleaner looking “Web Layout” view.
One thing you may notice is that the screen is very wide. Therefore, the way things look laid out in Word are not going to be the same as they are when you publish the post to your blog. This can be true inside the WordPress editor too, but the layout you’ll find in Word is likely to be much, much wider.
Because of this, one thing you may want to eventually do is to set your margins in Word to something narrower. It may be difficult to get it lined up exactly as you would like, but at least you will have a better feel for the approximate way things will look once they’re published on your site.
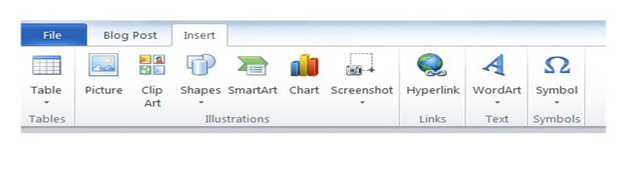
Graphics
You can use all of the nice Word graphics capabilities through the “Insert” tab at the top. There you’ll see the ability to insert tables, pictures, shapes, SmartArt etc.
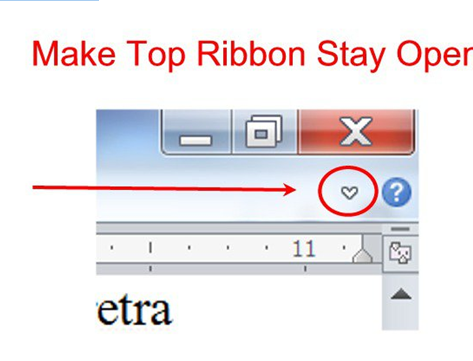
But the top ribbon is hidden until you click on one of the tabs—either “Blog Post” or “Insert.” You can make it stay open by clicking the tiny down arrow on the far right-hand side.
The way to get to all the options for an image is to first insert the image, and then double click on it. You should see a new tab open called “Format” and above that “Picture Tools.”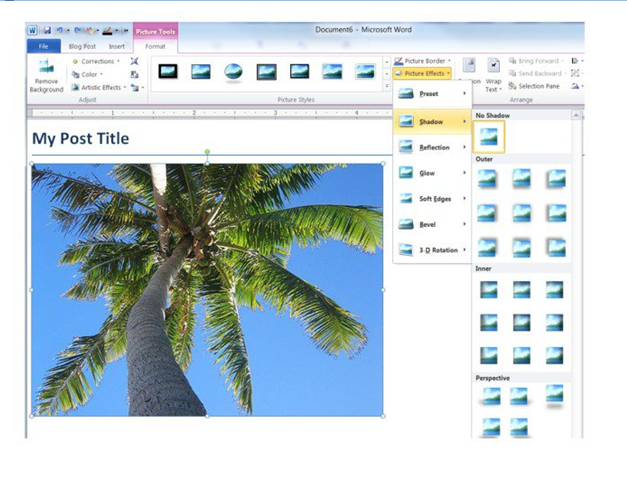
Insert a Category
To place your post in a category, in the “Blog Post” tab, click the “Insert Category” button. 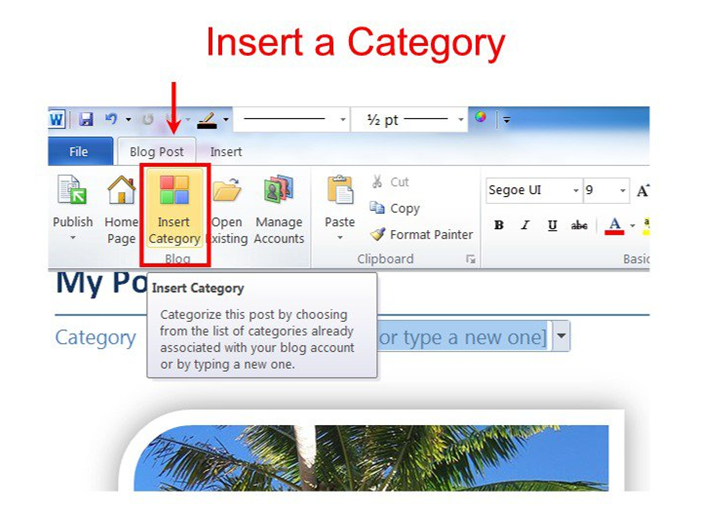
Publish or Save as Draft
To publish your post (or save it as a draft – “Publish as Draft”), in the “Blog Post” tab, hit “Publish.”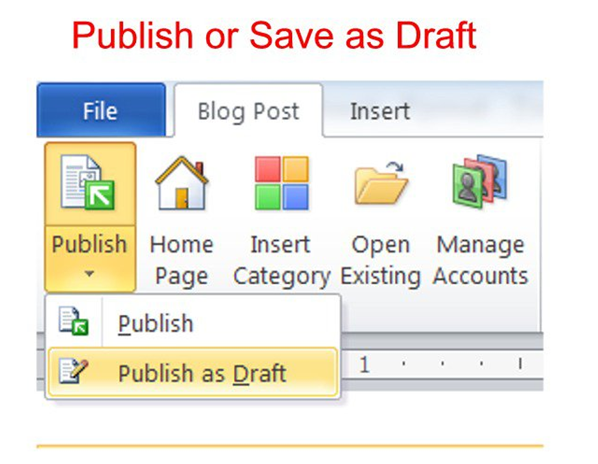
Extra Options
You will notice a few other options in the “Blog Post” tab.
Home Page – Opens your default browser to your site’s home page
Open Existing – Imports existing posts from your site so you can edit them
Manage Accounts – Allows you to switch to (or add) other sites to manage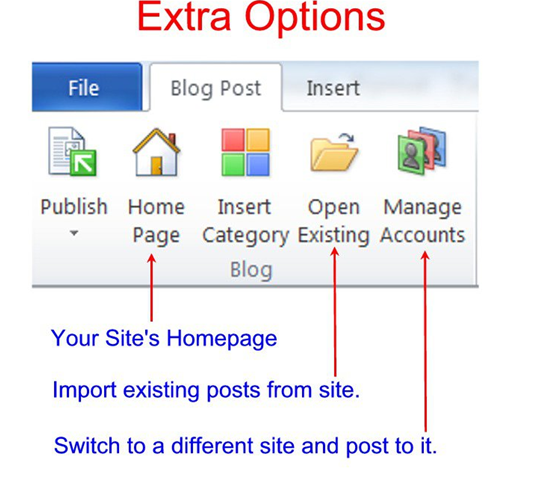
Other things
If you need to update your post, just hit publish again when you’re ready.
Whichever font you use in Word, your post will publish with that font, regardless of the font you have set on your blog.
Using Word as Your Offline Editor
You may or may not want to use MS Word full time for your blog editor, but at least you know it’s there should you or your clients need some graphics that aren’t easily made in other place.
One thought on “How TO Use Microsoft Word TO Publish Directly To Your WordPress Site”
Great site and a great topic as well. I was looking for this on the internet and found it on your website. I needed this kind of tips. My wait is finally over. Thanks a lot for sharing.